Ask Katie: Rancher curb enhancement

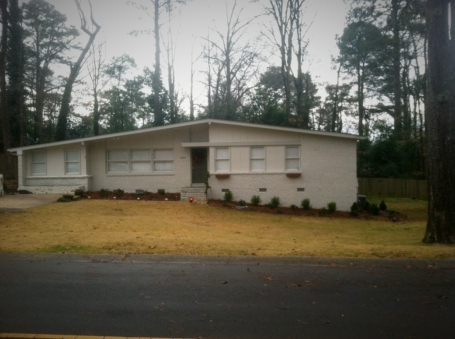
photo courtesy of the homeownerQ: We recently purchased a home that is a 60’s style single-story front gable structure with a low pitched roofline. The interior has been completely remodeled, but I really feel like something needs to be done to the front of the home (entrance) to make it complete. I do realize the roofline will be the most limiting factor, and we may just have to work around it. We really like the Cape Cod/refined look, but don’t know where to start with the ideas to help its curb appeal. Obviously, in the most cost effective way (paint trim, add entrance way, exterior coverings), I was curious to see if you could help us out with a few ideas to bring out the potential in the home.

Brian of Mountainbrook, AL

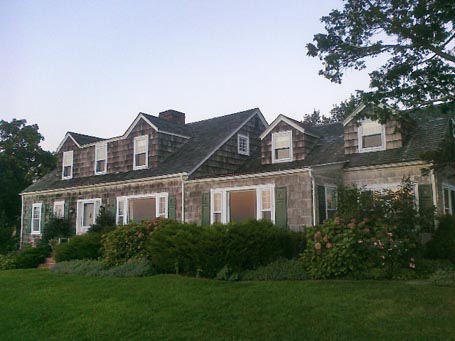
A: This rancher front elevation has great unrealized potential. It could really shine if we highlight and capitalize on its inherent ranchiness. That is not to say, however, that a subtle layer of non-ranch influence could not inform its unique countenance. But it would need to be a sympathetic influence, a compatible influence, not something too alien.

stengths and weaknesses

The simple, low-slung, gable roof of this home is probably its most identifying and strongest feature. The next most impactful feature may be the ganged horizontal windows, in what is presumably the living room, to the left of the entrance. The third strongest design element may be the horizontal sills, lintels and entrance canopy. The least successful portion of the front elevation may be the right side of the entrance where three disconcertingly vertical double-hung windows populate the horizontal swath defined by the brick window sill and wood lintel which becomes the entry canopy. Also, it's this side where the base of the home becomes uncomfortably muddled or non-existent. The planter off the far left of the home, in combination with the higher grade there, seem to better ground that side.

new entry porch

The introduction of a more substantial entry porch which extends out from the existing doorway and to the right could help remedy much of what ails the front of this house, while reinforcing the horizontality of the sills, lintels, and canopy, as well as balancing the horizontal bank of living room windows to the left.

I suggest removing the existing entry stoop and replacing it with a grey, rectilinear, stone stoop/terrace that extends to the left a couple of feet and all of the way across the right front and six to eight feet or so forward of that portion of the house. (Of course, this assumes that the local zoning would allow such a stoop/terrace footprint.) The top of the new stone stoop/terrace could run a few inches beneath what appears to be vents along the front. The lower height of the new stoop/terrace would likely mean including a separate landing (of the same material) that's a step or so up in front of the entry door. The new stoop/terrace could end in steps to grade on the far right facing the side yard. The new stoop/terrace would reinforce the home's horizontal design and introduce a base to better ground the home.

A new, deeper, horizontal, wooden canopy in the location of the existing canopy that's supported beneath by thin metal stays/brackets could extend to the left of the door over the new stoop/terrace and to the right across the swath of windows and stop where the existing canopy/lintel stops, while projecting about three and one-half to four feet in front of the right portion of the house. This would provide porch shelter and further reinforce the home's horizontality and the horizontality of the swath that contains the double-hung windows. 

new materials and color palette

The introduction of some natural-finish, warm-stained cedar (or fir) might lend the exterior more warmth to play off the painted white brick. In fact, I'd recommend painting the brick another color, something in the light green lichen color family might be pleasant. The existing vertical composite siding above the windows could be replaced with natural-finish, warm-stained vertical cedar v-groove tongue and groove boards. The existing vertical composite siding in between the double-hung windows (both on the right and left sides of the front) could be replaced with natural-finish, warm-stained horizontal clapboards -- again, to reinforce the horizontality of those areas. Window (and door) surrounds in all areas could be replaced with the same natural-finish, warm-stained cedar. Of course, this new palette of materials and colors would need to be applied on all sides of the home. A terrace/landing guard rail composed of new natural-finish, warm-stained intermediate posts, horizontal cable rails, and a natural-finish, warm-stained, shaped cedar cap might complement the new look nicely.

slatted wood screens

You might even consider adding fixed, slatted, natural-finish, warm-stained cedar screens -- the height of the lower double-hung sashes and in alignment with them -- running across the front of the horizontal openings (which contain the double-hung windows and infill to the far left and right of the front door). These would act as privacy screens (instead of the interior window shades) in the more private spaces, while reinforcing the horizontal swaths between the painted brick elements.

enhanced ranchiness infused with an Arts & Crafts touch

The addition of the new horizontal stoop and guard rails, a deeper bracketed horizontal canopy roof, a new materials and color palette, and new slatted wooden screens would enhance this home's ranchiness, while better grounding it and lending it a dash of Arts & Crafts influence (an influence not as far afield from a ranch as a Cape influence).

by Katie Hutchison for House Enthusiast

Email architect Katie Hutchison (Katie@katiehutchison.com) your general-interest residential design question. Put "Ask Katie" in the subject line and summarize your question in a couple of paragraphs. Include your name, town, and state. Check back with the Ask Katie category to look for Katie's responses to select questions.

Ask Katie: Kitchen keepers and cost savers in a rental

cover photo courtesy of Amazon.comQ: We’re planning to build a kitchen in a house we’re renting. The space is in a new addition (roughly 16x22) in a 1930s Sears kit house. Since we are never going to resell the house, we are looking for ways to do this cheaply with an eye towards investing in pieces we can take with us. As an example, I would rather use inexpensive flooring and invest in a good looking rug. Any other ideas?

Tim from Brookeville, MD

A:  This is a great question for a thrifty Yankee -- especially one who appreciates vintage Sears Roebuck kit houses. I have a few recommendations to offer. First, use and/or convert furniture and/or salvaged items to function as kitchen worksurfaces and storage units. Then, team these with affordable, stock, built-in cabinet cases and open shelves. Finally, round out the kitchen with economical fixture and finish alternatives. When it’s time to move, you could either take some of the items with you or be happy for the savings they offered as you leave them behind.

furniture/salvage accents
For example, sizable farm tables and baking cupboards served their purposes well in kitchens of yore. Why not put them to work in today’s kitchen -- particularly one added to your 30’s home? A sturdy table makes for a great

Read more

Ask Katie: Shading a deck

Example of a wisteria-covered, rear-yard arbor in northern CaliforniaQ: We own a Spanish-style bungalow, built in 1928, in San Jose, California. We added an attached deck to the back of the house that we access from a sliding-glass door. I'm interested in putting up a permanent fabric awning to cover some of the deck in order to give us relief from the sun and to cool down the back of the house (I hope) as it gets direct sun for many hours of the day during the summer. We strive to maintain the historic character of the house in all improvements we make. What do you think?

Alissa from San Jose, CA

A:  As a New Englander, I’m not a fan of residential fabric awnings. They generally can’t handle our weather. Sure, folks remove them in the winter around here, but conditions in the shoulder seasons can be problematic too. Over time, the New England climate often takes a toll on awning material -- causing it to fade, yellow, mildew and/or tear.

Regardless of locale, there’s also the matter of the flimsy structures that typically support fabric awnings. Whether retractable or fixed, they can be rather unsightly, hardly a complement to your vintage bungalow.

Instead, I suggest you consider an arbor. A wooden arbor planted with wisteria (or another vine), like the one in the above photo, could provide pleasantly dappled shade. If the arbor covered a six-foot-wide swath of deck off the back of your house, it would be substantial enough to provide some relief from the sun without hogging too much deck space. Christopher Alexander’s pattern No. 167 “Six-foot balcony” in A Pattern Language makes the case for creating such a space six-foot deep, minimum, in order to attract frequent use. 

Constructed of cedar (or a similarly rot-resistant wood) the arbor could extend from the rear wall of your home and be supported on the other end by a beam with shaped ends. Substantial, chamfered wooden posts of the same material could in turn support the beam and sit on approximately 30-inch-high broad bases with slightly tapered sides to suit your Spanish-style bungalow. Depending on your home’s exterior finish, the bases could be clad with wooden shingles or perhaps stucco.

Or, you might consider adding a porch roof over a portion of your deck.  Again, it needn’t extend much more than six feet or so from the rear face of your house. I’d recommend an exposed wooden roof structure with wooden v-groove planking on its underside (running perpendicular to the rafters) and perhaps supported in a fashion similar to that described in the paragraph above for an arbor. The roofing material could match the main house, or you might want to introduce a contrasting material like standing-seam metal for a lighter, more stream-lined look.

The arbor is a softer solution than the porch-roof solution, but either would provide shade while complementing your home’s historic character.

by Katie Hutchison for the House Enthusiast

Email architect Katie Hutchison (Katie@katiehutchison.com) your general-interest residential design question. Put "Ask Katie" in the subject line and summarize your question in a couple of paragraphs. Include your name, town, and state. Don't include any attachments. Check back with the Ask Katie category to look for Katie's responses to select questions.

Ask Katie: Dormer and exterior-detail conundrums

Q: We have purchased a Cape house on Long Island with the front elevation as seen in the attached picture.  A poorly detailed "Nantucket-style" dormer was added at some point. Also, there was a later addition (to the right in the picture) with two gable dormers.

We are about to renovate this house, and while we would love to avoid *any* dormers, they are just too essential to the interior space.

Any ideas? Feel free to comment on any aspect of the house!

John and Cary, Springs, NY

photo provided by homeowner

A:  I’m breaking my own “Ask Katie” rule here by including a photo with a reader question, but because it illustrates a number of design issues many homeowners encounter, I believe it’s worth sharing.

dormers

As I’ve mentioned before in House Enthusiast and in columns I’ve written for Fine Homebuilding and the Journal of Light Construction, dormers can be a great way to gain second-floor living space without adding to the building footprint. The challenge is to keep them from overwhelming the roofscape or throwing the massing off balance.

Unfortunately, the dormer shown on the original Cape is too flat-faced and prominent. My first thought was of cat ears. Had it been a true Nantucket-style dormer the center shed-roofed portion would have been recessed from the two dog-house (excuse the pet theme) dormers. Overall, it’s also too tall and showing too much shingle wall relative to the windows. It is, however, nested fairly well, meaning it’s set back from the main roof lower eave, set below the main roof ridge, and leaves a generous amount of the original roof on either side.

I imagine that whoever created the addition to the right, was influenced by the cat-ear dormer when they added the two independent dog-house dormers there. Or it could have been the other way around; the dormers to the right could have inspired the dormer on the original Cape. In either case, the two dog-house dormers on the right strike me as more successful. For one, their windows are shorter, which in turn resulted in shorter dormers which are less obtrusive. I also appreciate that the dog-house dormers over the addition do not include the shed dormer component in between them, so they aren’t trying to duplicate the other dormer, but merely respond to it. These I would keep.

The solution to the dormer over the original Cape may be to replace the cat-ear dormer

Read more

Ask Katie: Thoughts on roofs and roof/wall-height relationships

Q: My husband and I are building a new house and are confused by roof pitches and wall heights. Does the roof pitch have a relationship to wall height?

Cathy from Hammond, LA

For having her question selected for this post, Cathy is receiving a complimentary set of KHS photo note cards.

A: Often it does. Roof slopes and the relationship of the roof to wall height (relative to the floor and ground) are critical to a successful design. Often the roof and its disposition are the most defining characteristics of a home.

roof slope 101
For the sake of discussion, let’s say there are three roof-slope categories. I consider a lower slope to be 7/12 and below. A steeper slope is 10/12 and above. A mid-range slope is everything in between. Think of roof slope in terms of rise and run. A 4/12 slope means that for every 12-inch horizontal run, the roof slope rises four inches.

Roof slope is partly a function of climate, available roofing materials, and structural considerations. The steeper the roof slope is, the easier for accumulated snow or water to slide or run off. So, wetter, snowier climates tend to have steeper roofs. Materials that perform well on a steeply sloped roof may be problematic on a roof slope below 4/12. Don’t forget that the primary role of the roof is to provide overhead protection from the elements. Roof slope can also have structural implications, with flatter roofs having different requirements than more steeply sloped roofs. Some roof/wall-height relationships can trigger other structural considerations too.

Read more